Pages - Menu

Showing posts with label Fall Crafts. Show all posts

Sep 5, 2019

DIY Concrete Pumpkins

DIY CONCRETE PUMPKINS

Hey Ya'll!

Ready to make some concrete pumpkins for Halloween?
I sure am even though it is September 5th.  I've been ready for a few weeks now.
I made these two pumpkins for just about $4.00 each.
And they weigh approximately 25 pounds each!

This is a very simple and inexpensive process, so don't worry much about messing up.

Here's what you will need:
- A 50 pound bag of Quickrete $5.00 (I got from Lowes) Makes 2 pumpkins
-Pam cooking spray or Generic brand like I used "Chef's Own $1.00
-2 Plastic Pumpkins $1.00 each
-Mixing bucket
-Water
-Sharp utility knife
-
.
I didn't have any plastic pumpkins on hand from last Halloween so I first looked around at the local Goodwill.  There I found three of them for only .99cents each.   Sad only because new at Walmart they were 1.00 each. lol. So even though super cheap, I just figured they'd be cheaper for some reason.


Here is a photo of most of my supplies.  Notice there are three pumpkins I had ready.
Well, I found out quick that a 50 pound bag of Quickrete concrete mix only makes 2 pumpkins!
Yes that's right.  So each pumpkin after done will be approximately 25 pounds right?


I used an old Lowes plastic 5 gallon utility bucket for mixing the concrete in.

Here's my trick. Since the bag is so heavy and awkward to handle, I sit it on the back of my truck's tailgate.  Then I slit a whole into the bottom, corner of the bag and let it freely pour directly into my bucket.


This is so much easier than handling the bag so many times, adding a touch more and so.


Don't mix it too runny!  Read your bag for best instructions.


Here is a very important part!
Right before you begin to pour your concrete mix into your pumpkins, 
YOU MUST SPRAY THE INSIDES GOOD 
with a coat of the PAM or Generic cooking spray.

This will coat the insides and allow the concrete to release easier later on after drying.


I used a plastic, kids shovel I had on hand for dipping the concrete out and into the pumpkin.


I tried to keep it from coming out.
But it was hard because after you fill up your pumpkin, 
you must keep lifting it up and tapping it down on the ground 
to release any air bubbles trapped inside.
Do this over and over a few times.


You can always take your hand or cloth and wipe away the excess right at the rim.

Now comes the hard part.....
You must let them sit for about 24 hours before you start to cut the plastic buckets.


This is how I made my cuts.
I did four slices, top to bottom very carefully.
Try to avoid cutting so deep that it marks the concrete.
The concrete of mine, was still not completely set up even after 24 hours.


And then you slowly peel them back.


And then the concrete pumpkin will finally begin to emerge completely out of the plastic.


And this is it.
This is my very first try at making a Concrete Pumpkin.

I did let them sit another 24 hours after getting them out of the plastic before handling them too much.

You can see the holes in the concrete where air was apparently still trapped.

But for my purposes they are just fine.
I've read about a countertop mix available at Lowes that allows for a super smooth finish.
But for me just wanting them to sit outside as decoration, I don't want to add anything to the mix to make it very expensive.


Here are the plastic buckets after I got the concrete out.


And here it is after it was all complete.
I like the concrete look but on the next one I may do a white, crackle paint finish.

Sep 1, 2017

HALLOWEEN MASON JAR LID ORNAMENTS


Hey Ya'll.
Who's in the mood for some Halloween Mason Jar Lid ornaments?
I know I sure am!

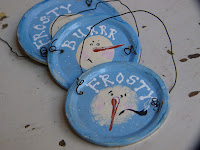
These stemmed off from the idea of my Snowman Mason Jar Lid ornaments you see below:
 SNOWMAN LID ORNAMENTS

 Here's how I made them in case you want to give it a go. 
If you don't have any on hand, here's how they look in boxes at Walmart.
started out with a bunch of plain ole, used, metal Mason Jar lids in two sizes of
Regular: 2 2/4"
Wide Mouth: 3 3/4"
Some were new and shiny, some old and rusty. It doesn't matter to me.
And I spray painted them a base color in various shades of green and maroon that I had on hand.
For the Fall ones I was doing today, I stuck with the Satin Green.
The white was used for speckling (snow) only because it's a cheaper can and doesn't cover good.
Here are the Rustoleum and Valspar that cover great in one coat:


After they dry, they are a flat, softer color. Then we're ready to get started painting with craft paint.
My favorite brand is Folk Art but I do have a lot of Apple Barrel on hand too.

I just kinda looked at some magazines I had on hand to get ideas of decorations for the pumpkins.
And then just free handed the rest. Any fall or Halloween themed ideas would work great on these!


After letting all the paint dry for a bit, I decided to start adding the wire hangers.

I happened to have a metal punch on hand, but you can easily use a hammer and a nail to punch a hole in each side for a wire.

Then I took some homespun pieces I had laying around, in as close a match as possible and just tied them on.

And here they are all ready to go in my co-op and my ebay shop.

On this pumpkin, I used Elmers Glue underneath a quick off white color to give the almost crackle look.


Happy Crafting Ya'll,
~Lisa

Sep 12, 2015

MASON JAR LID WREATH DIY Craft Tutorial

MASON JAR LID WREATH

Want a cute way to use up all of those extra Mason Jar lid rings you got laying around? I recently saw a  few posts on Pinterest about these and I couldn't wait to give it a try.
I have quite a few...
  And this is how I did it.

Super easy.  Seriously.  Just take some sort of heavy wire,  or in my case, I used a wire clothes hanger.  I used wire cutters and clipped one end open so I can string the rings on them.
 
Then I just bent it to the shape I needed and started sliding them on.
 
 
The number of lids basically depend on how big you want your wreath to be.  Oh, and these ones I was using are Regular mouth, standard lids. So just play with it.  But I'd recommend at least having 30 to 50 rings on hand. More for a larger one or so on. 
 
You could also experiment with "fillers" in between each ring to save on using so many. But for my first one here, I'm just gonna keep it as simple as I can.

And seriously, that is it.  After you have strung enough, just twist up your wire together and if you can, leave the hook for easy hanging. Otherwise you can tie on some sort of fabric hanger if you have to.

You probably will have to go back, once it is hanging and straighten out the rings. They tend to move and shift while working with the wire a lot.
See how they shift. But it's easy to straighten them up. And after it's done, they stay even with the door opening and closing.

Super easy and cheap craft that definitely screams country any where you place it.


I'm already thinking of making another one.
But for it, I am thinking of experimenting with those foam floater sticks for swimming. I bet they would hold good, as long as they will fit inside the rings. And I bet with those, I'll definitely have to use some sort of filler to hide the foam rings. 

See ya'll next time,
~Lisa

Sep 10, 2015

MASON JAR RING PUMPKINS with FREE LINKUP

MASON JAR RING PUMPKINS
Hey ya'll!
Time for some more Fall crafts to get us geared to the cooler months a comin'!
Here's some cute pumpkins I recently made out of some old, leftover Mason Jar Rings.


It's a pretty easy craft and all you really need is:
-Mason Jar Rings (save the lids too!)
-Twine
-An acorn
-Glue (I use E-6000 found at Walmart)
-Cinnamon colored paint (optional)

Okay, lets get out our Mason jar rings. 
Here's my big ole wooden slat, bushel basket full of the ones I save:

If you don't have any on hand, just grab a few boxes at any Dollar General or Walmart. They have tons in store now because it's canning season. And they are only about $2.00 a box or so of 24.

Now grab you a roll of some type of twine or wire if you have any. I use this basic jute, twisted twine for about all of my crafts anymore. It is like $2.00 a roll at the Dollar General.


Alrighty, now on to the stringing of the lids.
Just basically just take a bunch of lids, facing the same way, and string them onto your twine.  Don't cut your twine yet until you know how big you want to make your pumpkin.  

For one of my pumpkins I used the Large mouth rings and for the other smaller one, I used the regular size rings.
Here's my sister holding it up for a pic.
It will probably take more than you are thinking of in your mind. Mine did. But the fuller it is, the better it looks.

After you get a bunch strung on it and rounded up how you like, just kinda tie the twine together to give it a strong hold.


Be sure to leave enough twine hanging out, before you cut it, to make as a cute looking vines!

And then just take you a pine cone and glue it in place right in the center top. 
 Make like a good stem.
You can buy a bag of pine cones and plastic pumpkins at the Dollar Mart right now for a $1.00. A cute variety bag!

And then just go and sort of dry brush you on some streaks of cinnamon colored craft paint to about every other ring.  Not too much color, just enough to give it a bit of something.  Kind of rub the brush off on some paper before using it.  Because you really don't want too thick of a coat. Just kind of streak it on.
After this pic, I took my finger and rubbed off some of the orange to give it a more worn look.
And that is about all there is to this cute Mason Jar Ring Pumpkin craft!

Here's a few more pics of them:


Hope ya'll liked this cute little Mason Jar Ring Pumpkin idea. I wish I could take the credit for it, but I can't. I first saw it on Pinterest.  But whoever did come up with it first was a genius!

Have a craft related post you'd like to share in my linkup below? Share away! & See ya'll next time,
~Lisa