Pages - Menu

Showing posts with label craft night. Show all posts

Sep 5, 2014

PINE CONE SNOWMAN ORNAMENTS


I had an assortment of craft items laying in front of me and I had an "Ah-Ha" moment.  There was a bowl full of snowman heads laying beside a stack of pine cones.  I wandered what the heads would look like on top of the pine cones as ornaments?  And here is how my thought turned out.


I had these basic pre-painted snowman heads from a previous craft lot I bought at the Dollar Mart, the bag was only $1.19.  I added the long noses and eyes and such.  But if you don't have them, don't worry, you can use those little bags of unfinished beads from Wal-Mart in the craft section. They are the exact same thing.


And then just gather you up some pine cones.  These in the photo came from an auction lot and appear to have been on a real tree at once.  But at the Dollar Mart right now, in the fall/flowers section, you can find the bag of fake pine cones of approximately 10 or so, for only $1.19.

And all you really do is take some E6000 glue (also from WalMart- it's awesome stuff) and glue the snowman head to the top of the pine cone.


Then just let it dry and add a strip of torn homespun around it's neck to look like a scarf.  Then to be able to some of them hang as ornaments, I tied another piece of homespun around the neck, but left it longer as a hanger.

 For the ones I am taking to my Booth #555 at the Peddlers Mall, I put them inside a clear baggie (from the baking section) and tied the top with homespun.

 By putting them in a clear bag, it makes for a great way to give as a gift if someone prefers.


Super Simple!


Happy Crafting,
See ya'll next time!
~Lisa

Aug 26, 2014

Primitive Wooden Spoon Magnets

I recently posted about how to make primitive, wooden spoons here: PRIMITIVE WOODEN SPOONS with step by step detail. It was a great project! And got lots of interest from many of you.

I have since revisited this idea and turned the crafting up just a notch by making them more interesting.

Here's how I did it:

I started off with plain, simple wood spoons found at Walmart in packs of 4 for around a dollar in the kitchen supply section.

I use a few of the same photos from previous posts when it is plain wood spoons so I don't have to take them for each craft post. lol. Just in case you are tired of seeing this same pic I use in my spoon posts.

Very cheap!

I bout about 10 packs of these. And then I paint them in a variety of colors. Here's a group of mine being painted in ivory white. I used spray paint this time because it was faster.


Just mix and match sizes and paint them in groups. Let dry for a few hours. Don't forget to paint the backs!

Sometimes though, for certain colors, you will need to hand paint on some craft paint for the base coats. This takes more time, but you have many great colors to choose from. I tend to stick to basic black, navy blue, wine red, okra yellow and sage green as base colors.


And then after you have a ton of all these colors ready, you're set for the next step.

You will need to paint over them with a second coat in another totally different color. Yes, I know sounds like a lot of work, but trust me, IT IS WORTH IT. It makes them look so much better.

And after that second coat, you will be ready to start some light to medium sanding. I use a light sand paper, nothing real heavy.
LOOK CLOSE at the REDish color one in the middle. Do you see how the black is the second coat? See when I took sandpaper and brushed off some of the second coat, it allowed the red underneath to show. And it makes it look older. I love it!

When I ran out of black spray paint, I brushed on some of that in the can too. I was worried it wouldn't sand off easy, but it did.


And after the sanding, I was ready to start hand painting some detail. I just looked around in magazines and online clipart for ideas in the primitive them and free handed them below.
Some I did a willow tree on, and old crow that I tried to paint, sitting on a crock. A simple bowl with a star and a window scene with shutters. And oh, a cute plate sitting on a shelf with a star in it. These took some time, about an hour to just do this part and lots of patience.

And then I was ready to add the magnet. I got the round ones from Walmart craft section cause they are stronger to hold notes and papers.

Just simply hot glue them on. The hold is super strong! And it dries fast!

And here's some that I have all finished and in my Peddlers Mall Booth #555:
I priced these for $2.49 each. I'm not sure if that is good or bad because I have none to compare them to. So far, I'm the only one that has made them in my area for sale. With such a strong magnet, I think it is worth it.

What do you think?


--------------------------------------------

Note: In case you don't want to do magnets on these: For the previous Primitive Style Wooden Spoons that I made and didn't turn into magnets, I grouped them in groups of 3 for sale, like this:


Aug 18, 2014

DIY Grubby Electric Taper Candles

 
In needing a grubby taper for one of my crafts, I figured I'd just try and make one.

Here's how it went. And it was super simple!

THINGS YOU MAY NEED:
Mod Podge
Cinnamon
Paint Brush

As you can see, I had to remove the bottom flat piece of the taper with pliers because I needed it to stick securely in foam. Totally optional and I'm pretty sure most of you won't need to do that.

Then I simply took some mod podge, brushed it on the entire taper with a small paint brush. I held it over a paper plate to hold back the mess.

And then while it was still wet with mod podge, I simply sprinkled some .50cent bottle of Dollar Store cinnamon all around the taper.
And then I found a place that I could hang it up to dry for the first time.
And after it was mostly dry and not falling off all over the place. I gave it a second, huge helping coat of mod podge all over the top of the cinnamon this time. And this way, it will seal up the cinnamon and keep it from trying to come off on our hands. 
After the mod podge dried, which only took about an hour, it was ready.

One more thing I did was replace the bland looking light with a grubby one I recently made to make it look more prim.

And here it is in my craft project that I needed it for.
I'm happy with it, and best of all I didn't have to go out and buy another item to finish my old tool box craft.

For Sale in my Booth#555


Jul 8, 2014

EASY PRIMITIVE WELCOME SIGN

Here's a plain old board that I picked up at a yard sale for only a quarter. Being plain wood, I knew I could make it into something cute for my Booth #555 .  And here's what I came up with.

First, I painted it in two cute colors, maroon and black, both flat.
Really simple and one coat of paint did the trick.

Then I rounded up a cute stencil that I keep a stack of in a cardboard box. They are really endless in life, as long as you wash them up a bit after each use. Here's the one I picked out.
It was a simple "Welcome" wording with a house also on it. I thought it would fit perfectly as a welcome sign outside of someone's front door.

Here it is all stenciled on. I used an off white mixed with a touch of yellow for the word WELCOME and the house and stars. I also run a line of checkerboard pattern along the bottom to add a little something.


I think it turned out okay just for a 25cent piece of wood that I found. What about you?

Happy Crafting! And don't forget to "like" Booth #555 on Facebook if you enjoyed any of these posts! :-)


Oct 21, 2013

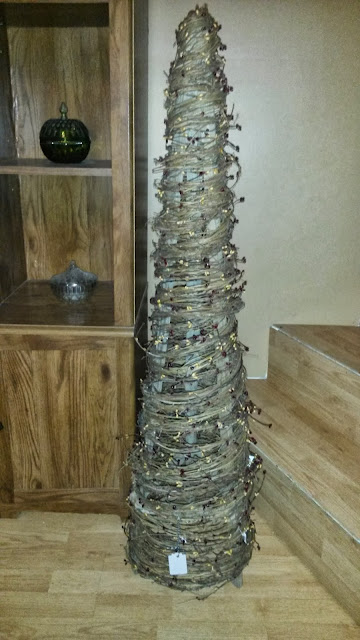
Primitive Tobacco Stick Grapevine Tree


I recently posted about how to make a Tobacco Stick Tree out of old tobacco sticks. Well, today I'm going to share with you the process of how I take this a step further by adding grapevine. And turning those old, unwanted tobacco sticks into a cute Tobacco Stick Grapevine Tree.
A row of old tobacco sticks after I had washed them. I try to pick close sizes when working with them.

Since making this very first tobacco stick grapevine tree, like this, I've made many more with a few different options now. I prefer the skinnier ones like this:


And here it is when I was just toying with some grapevine on it:

And I started to like it. So I added a few more strands to fill it in. And it started to look like this:
Then I had to add even more grapevine to hid the legs, which I was planning on leaving showing, but it looked weird. And I also started to tie in some sprigs of pip berry garland to add more interest, like this:

 The grapevine garland comes in rolls and looks like this when unrolled:

I didn't want to overload it with the grapevine garland so much that it would hide the tobacco sticks. I think they look kinda cute showing through. Here it is all done with everything except the lights.


And my latest one is now a tabletop version for those spots where we just don't have enough room for the full size. Here is the beginning of my very first ever, tabletop tobacco stick tree without any decorations so you can see the basic frame:

And here is the same one, tabletop version with a bit of grapevine garland just strung on. So you start to get the picture:
I'm still working on this one, :-) 
here's an update pic now:

But here's a few below that I have recently finished and sold:

This one with yellow pip berries was a trial and error. I took sprigs of pip berries and put them on one by one instead of stringing the strands of garland.


I didn't want to hide all the tobacco sticks. 


And here's another shorter, tabletop kind with grapevine, star lights and pip berries:

Small, skinny and plain. Love this one.


I made these to sell in my Peddlers Mall Booth #555,

Here's some other things I've been making too, if you are interested.


Primitive Crafts:

Tobacco Stick Chair


Americana Tobacco Stick Flag


Primitive Barnwood Tool Box


Happy Crafting Ya'll! 
-Lisa