Pages - Menu

Showing posts with label pumpkin faces. Show all posts

Sep 5, 2019

DIY Concrete Pumpkins

DIY CONCRETE PUMPKINS

Hey Ya'll!

Ready to make some concrete pumpkins for Halloween?
I sure am even though it is September 5th.  I've been ready for a few weeks now.
I made these two pumpkins for just about $4.00 each.
And they weigh approximately 25 pounds each!

This is a very simple and inexpensive process, so don't worry much about messing up.

Here's what you will need:
- A 50 pound bag of Quickrete $5.00 (I got from Lowes) Makes 2 pumpkins
-Pam cooking spray or Generic brand like I used "Chef's Own $1.00
-2 Plastic Pumpkins $1.00 each
-Mixing bucket
-Water
-Sharp utility knife
-
.
I didn't have any plastic pumpkins on hand from last Halloween so I first looked around at the local Goodwill.  There I found three of them for only .99cents each.   Sad only because new at Walmart they were 1.00 each. lol. So even though super cheap, I just figured they'd be cheaper for some reason.


Here is a photo of most of my supplies.  Notice there are three pumpkins I had ready.
Well, I found out quick that a 50 pound bag of Quickrete concrete mix only makes 2 pumpkins!
Yes that's right.  So each pumpkin after done will be approximately 25 pounds right?


I used an old Lowes plastic 5 gallon utility bucket for mixing the concrete in.

Here's my trick. Since the bag is so heavy and awkward to handle, I sit it on the back of my truck's tailgate.  Then I slit a whole into the bottom, corner of the bag and let it freely pour directly into my bucket.


This is so much easier than handling the bag so many times, adding a touch more and so.


Don't mix it too runny!  Read your bag for best instructions.


Here is a very important part!
Right before you begin to pour your concrete mix into your pumpkins, 
YOU MUST SPRAY THE INSIDES GOOD 
with a coat of the PAM or Generic cooking spray.

This will coat the insides and allow the concrete to release easier later on after drying.


I used a plastic, kids shovel I had on hand for dipping the concrete out and into the pumpkin.


I tried to keep it from coming out.
But it was hard because after you fill up your pumpkin, 
you must keep lifting it up and tapping it down on the ground 
to release any air bubbles trapped inside.
Do this over and over a few times.


You can always take your hand or cloth and wipe away the excess right at the rim.

Now comes the hard part.....
You must let them sit for about 24 hours before you start to cut the plastic buckets.


This is how I made my cuts.
I did four slices, top to bottom very carefully.
Try to avoid cutting so deep that it marks the concrete.
The concrete of mine, was still not completely set up even after 24 hours.


And then you slowly peel them back.


And then the concrete pumpkin will finally begin to emerge completely out of the plastic.


And this is it.
This is my very first try at making a Concrete Pumpkin.

I did let them sit another 24 hours after getting them out of the plastic before handling them too much.

You can see the holes in the concrete where air was apparently still trapped.

But for my purposes they are just fine.
I've read about a countertop mix available at Lowes that allows for a super smooth finish.
But for me just wanting them to sit outside as decoration, I don't want to add anything to the mix to make it very expensive.


Here are the plastic buckets after I got the concrete out.


And here it is after it was all complete.
I like the concrete look but on the next one I may do a white, crackle paint finish.

Sep 6, 2016

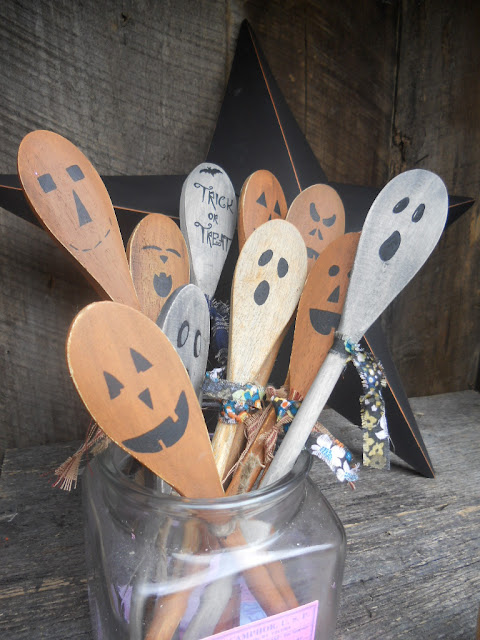
HALLOWEEN MASON JARS with Wooden Pumpkin Spoons


Hey ya'll!
Here's a Halloween themed idea for those plain ole' Mason jars you may have.  And if you don't have any on hand, Walmart and even the Dollar General stores carry them in cases.
Plain jar before
The Halloween themed Mason jar looks like it has a lot going on. Really it was pretty simple.

Okay, so first off we need to clean the outside of the jar with a little bit of alcohol.  This will remove all dust, lint and crap so it will have a good, sharp finish.
I just wiped it down with a paper towel dipped in the alcohol.

Okay then just paint the inside of the jar a color you want to pop. I choose the Cinnamon color from Folk Art craft paints.  

Oops, this is a pic of another one I painted Cinnamon on the outside. But anyways, just paint the orange on the inside if you are going for the look of my top pic, or vice versa if for another. 

And for the outside I went with antique white.

Okay, I've switched up the pics somehow of the inside and outside, but this pic shows the white inside. But remember you want the white on the outside if you want it like the jar at the top of this page.
For some reason I've vice-versa'd the pics.

Okay, anyways, after you have painted a good coat on the outside in white, and its dry, take some fine grit sandpaper and sand it. 

And you'll start seeing this.

I like all the scratchy type marks.
And wipe all the dust off then add one coat of sealer. I like the varnish in satin.


And let it dry then decorate it with burlap strips, a bell

                        
      and some of my pre-made  


And here it is finished:


And here's the other one I just finished up.


See ya'll next time,
~Lisa


You may also like:

More Mason Jars in the Halloween Theme

 LINK TO HALLOWEEN WOODEN SPOONS

Sep 5, 2012

Easy HALLOWEEN Candles


Want to make some cute, Halloween themed candles?
These would be very cute just sitting around to spruce the spooky feel!

All you need to start with is some plain white votives.  I got mine by the case at Big Lots.
I bought a pack of 24 votive sized candles at the local Big Lots for around $6.00.
This is what they looked like before.


These orange themed ones stemmed from my previous post, Ghost Candles


Once I got started making ghost faces on the white ones, I just had so many other ideas for them. Pumpkin faces, cat silhouettes, ghosts in a moon, the list goes on and on so I had to make more.


Then I painted some of them a base color of orange. 
I chose cinnamon color but it came out way more bright than I thought, which was okay. Left some white also, for the ghosts faces. 


Next I google'd "pumpkin faces" and choose images, so I'd have an idea of what some looked like to draw. Painted them on with basic black craft paint.

And then, here's where I got a little different with them. 
Instead of simply sealing them with a paint on sealer, I thought it'd be cool to set the faces in wax. 

Well, I keep a candle melted on my candle warmer at all times. I use it almost daily. It happens to be a yellowish-brown color, flavored butter-rum. (For the white ghosts at top, I used a plain white melted candle to dip them in.)

So I dipped each candle down in it, kinda quick, so that the paint wouldn't melt away from the hot wax. 
Then set them on a sheet of wax paper to dry. And that's it.

Oh, if you have noticed the grubby candle with the eyes, I simply grubbied it up a bit with some melted wax and cinnamon. Dipped that in the wax to set. Then continued on with painting the face and re-dipping him.


And then after they all dried, which they kinda quickly do, here is how I package them up.

I put them down in a small plastic bag and add a piece of cut brown paper. (Sometimes I cut up the brown wrapping paper or brown bags for this.)  And then use those printable re-turn address labels for a price tag.


And here is a little box crate of them all ready to go into my booth for sale.

Don't forget to check out my Ghost Candles for more pics!
And if you're interested, I made some Halloween Themed Wooden Spoons to display in Mason Jars also found here!
 Click here for Halloween Wooden Spoons

See ya'll next time!
~Lisa

Sep 4, 2012

Halloween Magnets from Old Christmas Bulbs


I was going through the phase this weekend  of making snowmen magnets 

 
when it hit me. 
I had an idea to use some of the white and orange Christmas tree bulbs I had sitting in a jar. Left the base color alone, even though it has imperfections, I like it. Painted on a simple face with some Folk Art craft paint, added some homespun and on a few, added an orange button. 


Then lastly, I glued on a heavy crafting magnet on the back of each. Don't want these falling and breaking if holding too many papers!  And here they are:

 Which one do you like best? The ghost or the pumpkins?

Happy Crafting,
See ya'll next time,
~Lisa